

How To Clean Painted Plaster Religious Statue
Anne is a writer and teacher who recently restored a decorative statue for a friend.
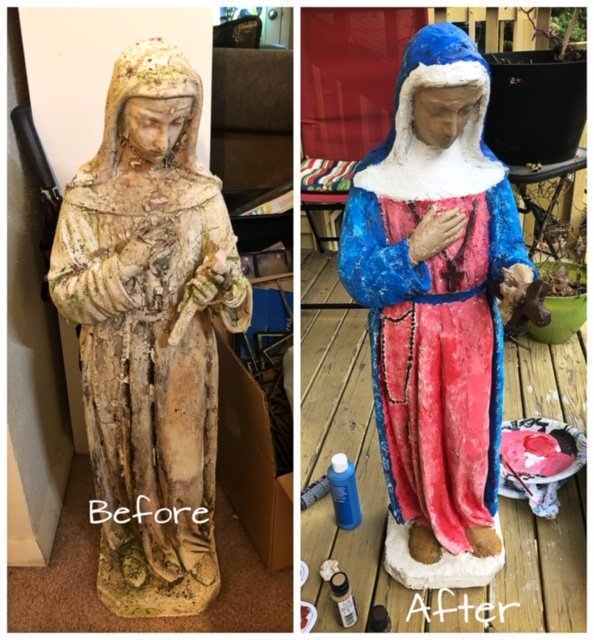
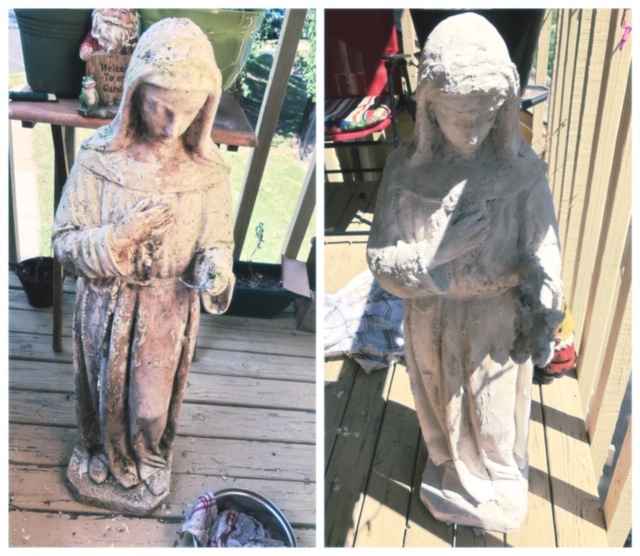
The earlier and after photos of a statue restoration.
The Art of Plaster Statue Restoration
Do yous accept an former garden statue or a statue in your home that is sometime and maybe disintegrated with years of use? Statues, especially ones that are placed outside in the elements, tin get weathered and worn over time, and it seems like a difficult task to observe a way to restore them and make them look similar new once again.
I recently took information technology upon myself to restore a statue for a friend. I accept had no experience doing this kind of project before, but using some ideas I had come upward with on my own, I was able to restore the slice and take it looking like new once more. Hither, I will give you a few tips on how to properly restore a decorative statue.
Step 1: Do a Thorough Inspection of the Harm
Before getting started on your project, it is a expert idea to find it and take photos then you know the kind of condition it is in already. This will help to identify any trouble areas and things that you see that need to be fixed.
In my case, the statue was severely disintegrated and worn from the elements, so I knew I would need to find something to fill up in the holes that I found on the statue. In improver, I had some pieces of the statue that were broken off, so I too knew at that place would be a little piece of work to do with re-assembling some pieces. This is why it is so crucial to really await at the statue beginning and decide what needs to be done. Y'all will accept a plan of action and be able to plot out the proper steps equally to how to restore information technology properly.
Footstep 2: Clean the Statue
The first affair you lot want to practise is clean information technology a little bit so you have a bare slate to start from. It is important and crucial that y'all don't use any harmful chemicals or cleaning products on the statue because it could harm the material and depending on what your statue is made out of, it could completely ruin information technology.
I used a damp material with water to clean my statue. There was some dirt and leaves that had become caught in some of the crevices, then I gently wiped the statue with a wet cloth to get rid of the layers of dirt and leaves. If your statue is very dirty, it might accept yous a few times to get it to where you desire it to exist. Please note that it does not have to be completely make clean, but clean enough for y'all to have a smooth surface to work with as you brand changes and repairs.
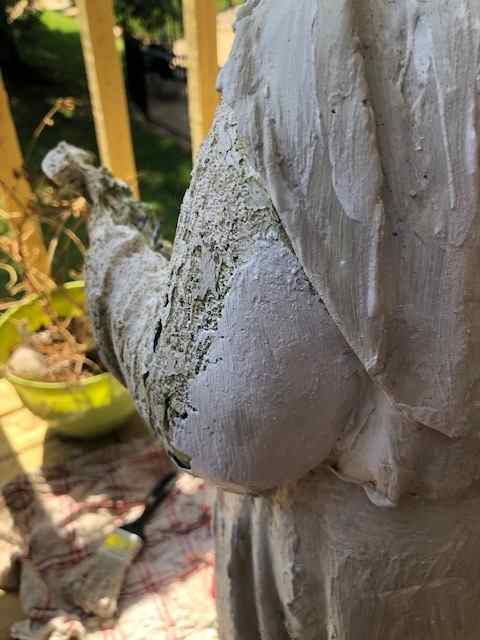
The departure between an area with no plaster and an expanse that has been filled in with plaster on a statue.
Stride 3: Add Plaster
I found in my case specifically, because it was and so damaged and there were so many holes in information technology due to weathering over the years, that I needed to make full in those holes. Plaster of Paris works wonders for this considering information technology will help fill the holes and however requite the statue a look of "stone". In improver, Plaster of Paris is very cheap and readily available at nearly craft stores.
Follow the instructions on the package specifically and begin "painting" it over the statue. I found that adding a thin layer first was the best option. I used a big paintbrush to castor on the plaster to brand sure it filled in the holes and created a smooth surface for me to work with. You do Non want to clump it on with your easily, every bit a lot of times, this will brand the statue loose its shape and you will have bumps and other unwanted impurities on information technology. Take information technology tedious and let it dry for a while before deciding if you desire to add more plaster later. A trivial goes a long fashion in this case.
The first step of adding Plaster of Paris to fill in the gaps and holes on the statue.
Scroll to Go on
Read More From Feltmagnet
Step iv: Sand
After adding the plaster, it is important for y'all to spend some fourth dimension smoothing out the surface, especially if you lot will exist painting on height of the plaster, which I highly recommend. Even if you aren't going to paint colors on information technology and just desire to paint it all white again, it is important to take a polish surface to pigment on.
I used fine grained sandpaper to lightly sand the area before painting information technology. Be conscientious in this process equally well, as you exercise non desire to sand too much and risk sanding the layer of the statue underneath. I was very light with my hands so as to create that smoothen surface on pinnacle, but conscientious enough not to impairment anything.
Step 5: Set Broken Pieces
In my instance, I had a few broken pieces that I needed to fix before painting. At that place was an arm that needed to be glued back on as well equally some deformities in the statue that needed to be filled in and fixed. For this project, I used Loctite glue. It is safe and easy to use, and you tin find it at virtually home improvement stores. The beauty of Loctite gum is the fact that yous can use such a small amount and information technology volition hold it together perfectly. You also don't accept to await for the glue to dry. You hold it together for about 20 seconds and it will attach tightly. No need to expect or become a clench if you tin hold it together for simply twenty seconds!
In addition to gluing pieces dorsum on, I also had a deformed cross on my statue that needed to be fixed. For this, I bought a pocket-sized pack of molding dirt (you can just this at any craft store). When y'all get the dirt out, mix it with a petty bit of h2o and mold it with your hands until it is soft and malleable. So, shape it over the area you want to ready. I put the clay right over the pinnacle of the cross. Then, slowly and carefully remove the dirt. You volition demand to broil it in the oven per the instructions on the bundle and then gum the piece on when you are finished.
Pace 6: Pigment
Once you accept completed the gluing process, information technology is time to outset painting. For my project, I used acrylic pigment specifically useful for outdoor purposes. You tin can detect this multi-purpose acrylic paint at whatsoever arts and crafts shop. Paint to your liking. If you are planning on keeping the statue all white, consider shading the crevices with a darker colour (maybe a light grayness), to give the advent of stone and make it await more natural. I institute that shading really helped my statue come alive.
When you are finished painting, you will want to apply an acrylic sealer spray, especially if you program on putting the statue in a garden or outside when you lot are finished. This will prevent the weather condition from doing damage to your statue once again and will preserve it for years to come.
Stride seven: Admire Your Finished Product
Once you accept finished, take some time to adore your work. It is astonishing what we can practice to restore one-time pieces of fine art, and it is so satisfying to see the hard work you lot accept done afterwards. Make sure yous accept pictures and so you have a before and afterwards motion-picture show of the process. If your statue is made of a specific fabric, make sure you lot know how to properly restore it. Plaster of Paris may not piece of work in all cases. If you are non certain, consult an adept at the arts and crafts shop that might be able to assist you in this procedure. In full general, I establish my method to work pretty well. Practice what you think works best for your project, and I promise these guidelines and tips helped give you some skilful ideas on how to restore your garden statue or decorative statue.
I could not let this go... on July 25, 2020:
In my opinion, I practise prefer the original statue which wears the time patina and damage.
To telephone call this restoration it is not appropriate every bit the result looks so much worst than the original statue and there is no sympathy in anything that was washed to information technology.
It is a shame that people destroy a beautiful statue in this manner.
Larry Slawson from North Carolina on Oct 21, 2019:
Very interesting. Thanks for sharing!

Source: https://feltmagnet.com/sculpture/How-To-Restore-Statues
Posted by: lacoursereupok.blogspot.com
0 Response to "How To Clean Painted Plaster Religious Statue"
Post a Comment